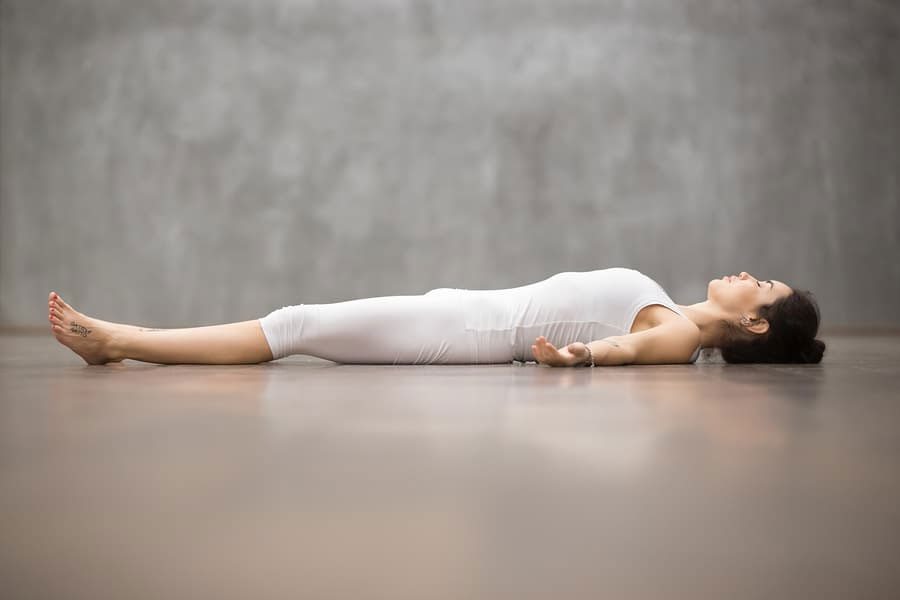
SAVASANA or CORPSE POSE is a pose of total relaxation and is usually done at the very end of your yoga practice. “Sava” is the Sanskrit for corpse. This posture relaxes the body, calms the brain and helps relieve stress and mild depression. It also reduces headache, fatigue, and insomnia and helps to lower blood pressure.

Method

  1. In Savasana it is essential that the body be placed in a neutral position. Sit on the floor with your knees bent, feet on the floor, and lean back onto your forearms. Lift your pelvis slightly off the floor and, with your hands, push the back of the pelvis toward the tailbone, then return the pelvis to the floor. Inhale and slowly extend the right leg, then the left, pushing through the heels. Release both legs, softening the groins, and see that the legs are angled evenly relative to the mid-line of the torso, and that the feet turn out equally. Narrow the front pelvis and soften (but don’t flatten) the lower back.
  2. With your hands lift the base of the skull away from the back of the neck and release the back of the neck down toward the tailbone. Broaden the base of the skull too, and lift the crease of the neck diagonally into the center of the head. Make sure your ears are equidistant from your shoulders.
  3. Reach your arms toward the ceiling, perpendicular to the floor. Rock slightly from side to side and broaden the back ribs and the shoulder blades away from the spine. Then release the arms to the floor, angled evenly relative to the mid-line of torso. Turn the arms outward and stretch them away from the space between the shoulder blades. Rest the backs of the hands on the floor as close as you comfortably can to the index finger knuckles. Make sure the shoulder blades are resting evenly on the floor. Imagine the lower tips of the shoulder blades are lifting diagonally into your back toward the top of the sternum. From here, spread the collarbones.
  4. In addition to quieting the physical body in Savasana, it is also necessary to pacify the sense organs. Soften the root of the tongue, the wings of the nose, the channels of the inner ears, and the skin of the forehead, especially around the bridge of the nose between the eyebrows. Let the eyes sink to the back of the head, then turn them downward to gaze at the heart. Release your brain to the back of the head.
  5. Stay in this pose for around 5 minutes. To exit, first roll gently with an exhalation onto the right hand side. Take 2 or 3 breaths. With another exhalation press your hands against the floor and lift your torso, dragging your head slowly after. The head should always come up last.

BRIDGE POSE or SETU BANDHA SARVANGASANA is a great posture for opening your shoulders and chest, a nice posture to practice to counteract forward bends …. but really, it can be whatever you need it to be —energizing, rejuvenating, or luxuriously restorative. “Setu” is the Sanskrit for a bridge, “bandha” for a lock, “sarva” means all and “anga” means limb. So, in Setu Bandha Sarvangasana, all your limbs are working to form a bridge with your body. This pose stretches the chest, neck and spine whilst stimulating the abdominal organs, lungs and thyroid. It is great for rejuvenating tired legs. It calms the mind and helps to alleviate stress and mild depression. It reduces anxiety, fatigue, backache, headache and insomnia. It improves digestion and is therapeutic for asthma, high blood pressure, osteoporosis and sinusitis.

Method

  1. Lie with your back flat on the floor, bend your knees and set your feet on the floor, hip-width apart, heels directly under your knees and as close to the sitting bones as possible. Leave your upper arms on the floor and bend your elbows alongside your ribs, pointing your forearms and fingers towards the ceiling. Turn your palms to face one another.
  2. Press your elbows and shoulder blades down into the floor, lift your chest, and bring your shoulder blades onto your upper back, wrapping your outer arms towards the floor. Keep your gaze straight up.
  3. Exhale and, pressing your inner feet and arms actively into the floor, push your tailbone upward toward the pubis, firming (but not hardening) the buttocks, and lift the buttocks off the floor. Keep your thighs and inner feet parallel. Clasp the hands below your pelvis and extend through the arms to help you stay on the tops of your shoulders.
  4. Lift your buttocks until the thighs are about parallel to the floor. Keep your knees directly over the heels, but push them forward, away from the hips, and lengthen the tailbone toward the backs of the knees. Lift the pubis toward the navel.
  5. Lift your chin slightly away from the sternum and, firming the shoulder blades against your back, press the top of the sternum toward the chin. Firm the outer arms, broaden the shoulder blades, and try to lift the space between them at the base of the neck up into the torso.
  6. Stay in the pose anywhere from 30 seconds to 1 minute. Release with an exhalation, rolling the spine slowly down onto the floor.

HEAD-TO- KNEE FORWARD BEND or JANU SIRSASANA comes from the Sanskrit words “janu” for
knee and “sirsa” for head. It works amazingly well in increasing the flexibility of the thighs, hamstrings, hip joints, back arms and shoulders. Specifically, it has the effect of stretching the spine, shoulders hamstrings and groins. It stimulates the liver and the kidneys and improves digestion. It relieves anxiety, fatigue, headache, soothes the heart and calms the brain. It can be therapeutic for high blood pressure, insomnia and sinusitis.

Method

  1. Sit on the floor with your legs straight in front of you, toes flexed and quadriceps contracted. Inhale, bend your right knee, placing your right foot against your inner right thigh and your right heel close to your perineum just below your pubic bone. Lay the outer right leg on the floor, with the shin at a right angle to the left leg.
  2. Press your right hand against the inner right groin, where the thigh joins the pelvis, and your left hand on the floor beside the hip. Exhale and turn the torso slightly to the left, lifting the torso as you push down on and ground the inner right thigh. Line up your navel with the middle of the left thigh.
  3. Reach out with your right hand to take the inner left foot, thumb on the sole. Inhale and lift
    the front torso, pressing the top of the left thigh into the floor and extending actively through the left heel. Use the pressure of the left hand on the floor to increase the twist to the left. Then reach your left hand to the outside of the foot. With the arms fully extended, lengthen the front torso from the pubis to the top of the sternum.

In India, accomplished renunciates traditionally carry a staff or stick, called Danda in Sanskrit, indicating that they have earned the title Danda Swami. The straight, strong staff is symbolic of the spinal column and the energy of self-awakening that resides in each human being.

Unfortunately, for most of us, however, our spinal columns are neither straight nor strong. Habitual slouching, chronic tension, stiff lower backs and hunched shoulders leave us unable to sit or stand with the effortless ease of a balanced spine. So, how do we build a vertical axis that steadies and supports our life’s journey?

We can begin by taking a look at STAFF POSE or DANDASANA. Like Mountain Pose (Tadasana), Dandasana is one of the classic yoga foundation poses and prepare us for the more intense poses. It is a simple seated pose that strengthens the deep muscles of the lower back, the abdomen, and the muscles deep in the pelvis. This improves overall posture and builds a solid foundation for the healthy alignment of the rest of the spine.

Improved posture helps prevent the overworking or over stretching of any one muscle group and contributes to stability and comfort in all activities. On the other hand, a habit of poor posture can lead to serious back problems, including a greater chance of muscle strain and herniated discs. So a key element of the practice of Dandasana is to cultivate awareness of the spine’s alignment from the tailbone all the way to the crown of your head and to use the strength of the practice to transform your habitual posture.

Method

  1. Sit erect on the ground, with your back straightened and your legs stretched out in front of you. Your legs must be parallel to each other, and toes should be pointed upwards.
  2. Press your buttocks on the floor, and align your head in such a way that the crown faces the ceiling. This will automatically straighten and lengthen your spine.
  3. Flex your feet and press your heels away from you.
  4. Place your palms next to your hips on the floor with the fingers pointing forward. This will
    support your spine and also relax your shoulders. Your torso must be straight, but relaxed.
  5. Relax your legs, and ground the lower half of your body firmly to the floor.
  6. Breathe normally, and hold the pose for about 20 to 30 seconds.

TRIANGLE POSE or TRIKONASANA is one of the quintessential traditional yoga postures. It
strengthens our physical and emotional bodies. It allows us to bring expansion to the muscles that need it most, and by extension, creates space in these places for the release of emotions. It stimulates and improves the function of blood through the entire body, reduces blood pressure and relieves stress and anxiety.

Trikonasana delivers the above benefits by stretching and strengthening the thighs, knees, and ankles. It also stretches the hips, groins, hamstrings and calves; shoulders chest and spine. It stimulates the abdominal organs and improves digestion. It relieves backache and is therapeutic for flat feet, neck pain, osteoporosis and sciatica – all of that provided by just one yoga posture! Did you ever have a better reason for practicing?

Method

  1. Stand in Tadasana (Mountain Pose). With an exhalation, step your feet 3 1/2 to 4 feet apart. Raise your arms parallel to the floor and reach them actively out to the sides, shoulder blades wide, palms down.
  2. Turn your left foot in slightly to the right and your right foot out to the right 90 degrees. Align the right heel with the left heel. Firm your thighs and turn your right thigh outward, so that the center of the right knee cap is in line with the center of the right ankle.
  3. Exhale and extend your torso to the right directly over the plane of the right leg, bending from the hip joint, not the waist. Anchor this movement by strengthening the left leg and pressing the outer heel firmly to the floor. Rotate the torso to the left, keeping the two sides equally long. Let the left hip come slightly forward and lengthen the tailbone toward the back heel.
  4. Rest your right hand on your shin, ankle, or the floor outside your right foot, whatever is possible without distorting the sides of the torso. Stretch your left arm toward the ceiling, in line with the tops of your shoulders. Keep your head in a neutral position or turn it to the left, eyes gazing softly at the left thumb.
  5. Stay in this pose for 30 seconds to 1 minute. Inhale to come up, strongly pressing the back heel into the floor and reaching the top arm toward the ceiling. Reverse the feet and repeat for the same length of time to the left.

WARRIOR II or VIRABHADRASANA II is one of the classic foundation yoga poses and, in general terms, improves circulation and respiration and energizes the entire body.

The main benefit of Virabhadrasana II is that it improves your stamina. In addition, it strengthens and stretches your legs and ankles and opens the hips and chest. It also stretches the groins, lungs and shoulders, as well as stimulating the abdominal organs. It relieves backache and is therapeutic for flat feet, osteoporosis and sciatica – all of that provided by just one yoga posture!

Warrior 2 or Virabhadrasana

Postures Asana. Pose for Stamina

Method

  1. Stand in Tadasana (Mountain Pose). With an exhalation, step your feet 3 1/2 to 4 feet apart.Raise your arms parallel to the floor and reach them actively out to the sides, shoulder blades wide, palms down.
  2. Turn your right foot out to the right 90 degrees and turn your left foot back to about 45 degrees. Align the right heel with the left heel. Firm your thighs and turn your right thigh outward so that the center of the right knee cap is in line with the center of the right ankle.
  3. Exhale and bend your right knee over the right ankle, so that the shin is perpendicular to the floor. If possible, bring the right thigh parallel to the floor. Anchor this movement of the right knee by strengthening the left leg and pressing the outer left heel firmly to the floor.
  4. Stretch the arms away from the space between the shoulder blades, parallel to the floor. Don’t lean the torso over the right thigh: Keep the sides of the torso equally long and the shoulders directly over the pelvis. Press the tailbone slightly towards the pubis. Turn the head to the right and look out over the right fingers.
  5. Stay for 5 nice long elongated breaths or 30 seconds to 1 minute. Inhale to come up as you straighten the front leg. Reverse the feet and repeat for the same length of time to the left.

MOUNTAIN POSE or TADASANA is one of the great foundation postures to be found in all yoga practices and it serves mainly as a tool to set you up for all the subsequent postures and also to improve your posture. It works to align your skeleton and to bring it back to a neutral stance. It is a particularly valuable resource to those who spend a lot of time each day in front of a computer screen or behind a steering wheel.

In addition to improving your posture, Mountain Pose also strengthens your thighs, knees and ankles, it firms the abdomen and the buttocks, it relieves sciatica and it reduces flat feet. One of the great things about Tadasana is that you can practice it anywhere, anytime – at the bus stop, in the office, whenever you are waiting in a queue – only you will know you are doing it – relax and enjoy!

Tadasana or Mountain Pose

Method

  1. Stand with the bases of your big toes touching, heels slightly apart (so that your second toes are parallel). Lift and spread your toes and the balls of your feet, then lay them softly down on the floor. Concentrate on spreading the weight of your body evenly across the four corners of your feet.
  2. Firm your thigh muscles and lift the knee caps slightly, without hardening your lower belly. Lift the inner ankles to strengthen the inner arches, then imagine a line of energy all the way up along your inner thighs to your groins, and from there through the core of your torso, neck, and head, and out through the crown of your head. Turn the upper thighs slightly inward. Lengthen your tailbone toward the floor and lift the pubis toward the navel.
  3. Press your shoulder blades into your back, then widen them across and release them down your back. Without pushing your lower front ribs forward, lift the top of your sternum straight toward the ceiling. Widen your collarbones. Hang your arms beside the torso.
  4. Balance the crown of your head directly over the center of your pelvis, with the underside of your chin parallel to the floor, throat soft. Soften your eyes. Hold the posture for five nice long elongated breaths in and out through your nose.

PLANK POSE or KUMBHAKASANA is one of the quintessential yoga foundation poses. It teaches you to hold yourself together—like a sturdy wooden plank—giving you the power you need for the more demanding poses and the grace to glide with ease through transitions between poses in the Sun Salutation and other sequences. Plank will build your abdominal strength, strengthen your arms and keep your wrists supple and healthy. If you practice this pose, over time your upper back and neck posture will improve, and you will create support for your lower back as you learn to engage your abdominals.

Method

  1. Start on all fours, with your wrists under your shoulders and wrist creases parallel to the front edge of your mat and your knees are directly under your hips.
  2. Spread your fingers and press down through your forearms and hands. Gaze down between your hands, lengthening the back of your neck and drawing your abdominal muscles towards your spine.
  3. Step one leg straight back, grounding all the toes; then step the other leg back. Do not allow your hips and butt to sag too low or poke too high – it is important to keep your body in one straight line, from shoulders to heel – like a plank!
  4. Reach your heels back and firm the legs. Lift your kneecaps and press the tops of your thighs up. Reach your tailbone back.
  5. Push your hands and all of your fingers steadily and evenly into your mat and straighten your arms.
  6. Keep your shoulders directly over your wrists and pull your shoulders down away from your ears, lengthening your neck. Then, draw your shoulder blades down your back and gently toward each other.
  7. Feel your breath move into your chest as it expands. Press your thighbones up and lengthen your tailbone back toward your heels, engaging your lower abdominals. Now, try to get longer. Reach the top of your sternum and the crown of your head forward toward the wall in front of you.
  8. Hold the pose while breathing smoothly for five breaths, letting your awareness grow and a sense of power suffuse your whole being.

The Cow-Cat Stretch is the incorporation of COW POSE or BITILASANA and CAT POSE or MARJARYASANA. The two asanas are paired together for a gentle, flowing vinyasa. For those of you who are not familiar with the term, vinyasa is defined as “breath-synchronized movement.” If you practice Vinyasa Yoga, you will move from one pose to the next as you inhale or exhale; that is, your movements will match your breathing.

The instructions below for the two postures each start and end in “table top” position. Go back and forth between Cow and Cat on each inhale and exhale, matching your movements to your own breathing. Do this for 5 to 10 breaths and try to keep an even distribution of weight between your hands and knees.

Both Cow Pose and Cat Pose provide a gentle massage and stretch to the spine and neck. They also stimulate the belly organs, like the kidneys and adrenal glands. Cow Pose also stretches the front torso whilst Cat Pose stretches the back torso. The postures are restorative in nature creating emotional balance, relieving stress and calming the mind.

Cow Pose or Bitilasana

Method

  1. Start on your hands and knees in a “tabletop” position. Make sure your knees are set directly below your hips and your wrists, elbows and shoulders are in line and perpendicular to the floor. Center your head in a neutral position. Let your neck be long, soften your eyes and take the gaze towards the floor.
  2. As you inhale, lift your sitting bones and chest toward the ceiling, allowing your belly to sink toward the floor. Lift your head, relax your shoulders away from your ears and look straight forward.
  3. Exhale, coming back to neutral “tabletop” position on your hands and knees.

Cat Pose or Marjaryasana

Method

  1. Start on your hands and knees in a “tabletop” position. Make sure your knees are set directly below your hips and your wrists, elbows and shoulders are in line and perpendicular to the floor. Center your head in a neutral position, eyes looking at the floor.
  2. As you exhale, round your spine toward the ceiling, making sure to keep your shoulders and knees in position. Release your head toward the floor, but do not force your chin to your chest.
  3. Inhale, coming back to neutral "tabletop" position on your hands and knees.